- Installation
- Upgrading from 1.0
- Configuration
- Assign the dropshipper role to users
- Dropshippers list
- Assign products to dropshippers
- The Dropshipper dashboard
- The Admin dashboard
- CSV Stock Update
- Hooks
IMPORTANT: If you didn’t purchase this plugin from codecanyon.net, then you are using an illegal version of it. You can purchase the original one here.
1) Installation – top
Extract woocommerce-dropshippers.zip and upload it to your WordPress plugin directory (usually /wp-content/plugins ), or upload the zip file directly from the WordPress plugins page. Once completed, visit your plugins page again and activate “WooCommerce Dropshippers”
Upon successful activation, the user role “Dropshipper” will be available from the users menu.
2) Upgrading from 1.0 – top
Since version 1.0 many changes have occurred, including a lot of additions to the custom role “Dropshipper”. Because of this to upgrade, from version 1.0 you must first disable the plugin, copy the new one via FTP or from the plugins page and re-enable the Dropshipper plugin.
Once the plugin is activated, you might need to re-assign the Dropshippers to the products.
3) Configuration – top
In the WordPress admin panel, select Dropshippers → Settings.
General
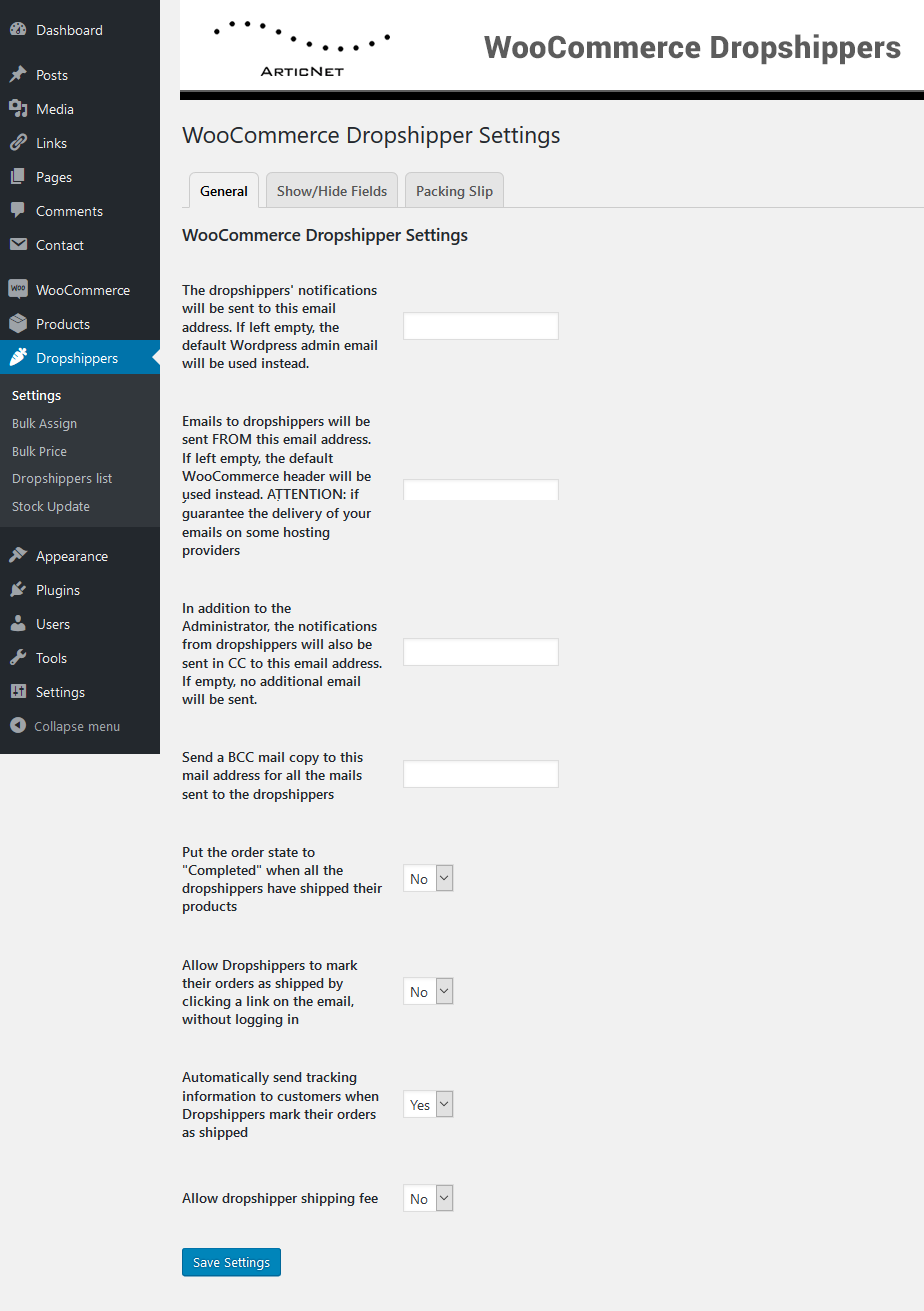
The dropshippers’ notifications will be sent to this email address. If left empty, the default WordPress admin email will be used instead:
The title says it all, right? Anyway this is the email used to notify the admin that a dropshipper has shipped an order. Use this field in case you need those notifications on a different email than the standard shop one.
Emails to dropshippers will be sent FROM this email address. If left empty, the default WooCommerce header will be used instead. ATTENTION: if you enable this, we cannot guarantee the delivery of your emails on some hosting providers:
Enter here an email address if you need to notify the Dropshippers of their orders from a custom email address.
In addition to the Administrator, the notifications from dropshippers will also be sent in CC to this email address. If empty, no additional email will be sent:
Enter here an Email address if you need other people to be notified when a Dropshipper ships his order.
Send a BCC mail copy to this mail address for all the mails sent to the Dropshippers:
Enter here an Email address if you need other people to read all the Orders sent to the Dropshippers.
Put the order state to “Completed” when all the dropshippers have shipped their products:
This option will put the order status to “Completed” automatically when all the dropshippers have marked their product as “shipped” from their dashboard.
Allow Dropshippers to mark their orders as shipped by clicking a link on the email, without logging in:
Sometimes Dropshippers don’t have time to login to your platform and mark their orders as shipped. With this option enabled they can simply open their Order Email and click on a link!
Automatically send tracking information to customers when Dropshippers mark their orders as shipped:
When an order is marked as shipped, if the Dropshipper has previously added a tracking number to his order, then the customer will be notified with the list of the shipped products and the tracking information.
Allow dropshipper shipping fee:
This field allows dropshippers to have a shipping fee. Dropshippers can set national and international shipping fee (along with their country of shipping) from their own panel. When a customer orders a product that is shipped from the same country set by the dropshipper in their panel, the national shipping fee will be automatically added to the cart, otherwise the international shipping fee will be selected. This only applies ONCE per dropshipper. So if a dropshipper has 4 items in an order, the fee will be applied ONLY ONCE. In the same way, if 4 different dropshippers have a product in an order, the customer will pay each dropshipper’s fee (along with the store one if applicable).
Show/Hide Fields
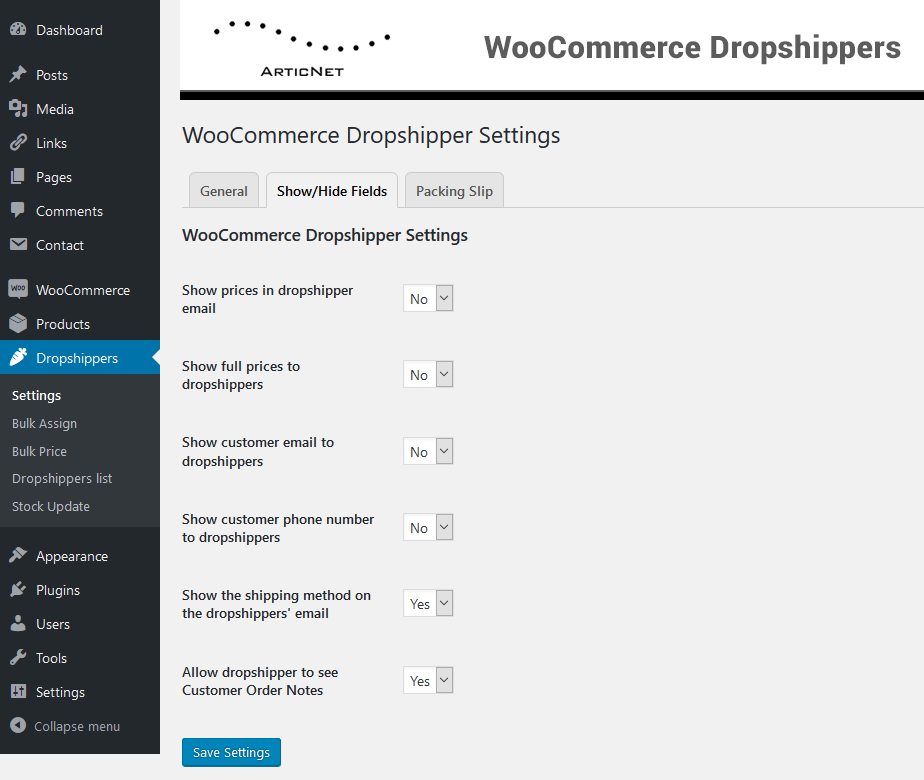
Show prices in dropshipper email:
Hide and show prices on the emails to Dropshippers.
Show full prices to Dropshippers:
Here you can choose whether or not the Dropshippers affiliated with your website will be able to see the total price of their orders. This means that from their panel, they will see the full price of the products (their commission and the resell price you put on the store).
Show customer email to Dropshippers:
Controls the ability of the dropshippers to see the customer’s email address from their orders list
Show customer phone number to Dropshippers:
Same as the previous one, but for the customer’s phone number.
Show the shipping method on the Dropshippers’ email:
This controls the ability of the dropshippers to see the shipping method (including price) chosen by the customer. The shipping method shown will be the one specified in the shop, not the one that the dropshipper sets in the dashboard.
Allow dropshipper to see Customer Order Notes:
This option will make Dropshippers able to see Customer Order Notes in their Dropshippers Order Email. To make this option work, you will need to activate Customer Order Notes in the WooCommerce general settings.
Packing Slip
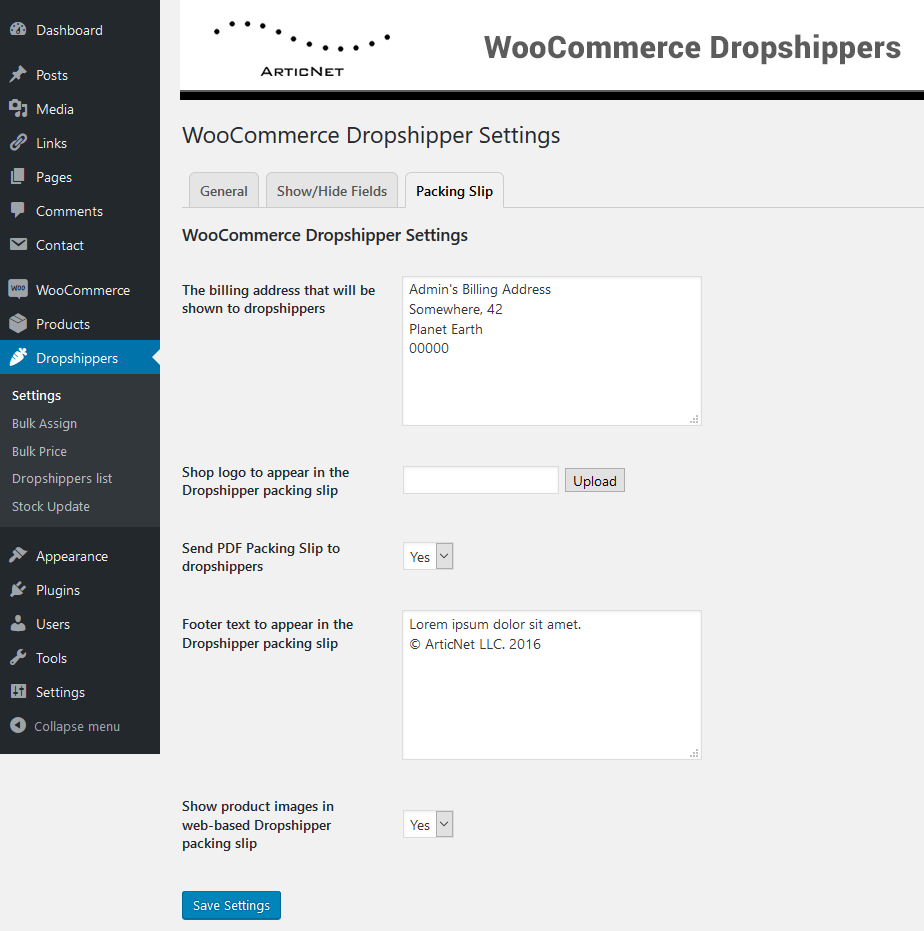
The billing address that will be shown to Dropshippers:
As the title suggests, this is the billing address ( of your shop) for the Dropshippers. It will be shown on the orders they get via mail, while the shipping address will be the address specified by the user when placing the order (just like every other order on Woocommerce).
Shop logo to appear in the Dropshipper packing slip:
This field along with the next one are used to display a custom logo and custom footer text in the packing slips that will be printed by dropshippers.
NOTE: Please only use .JPG or non-interlaced .PNG files for the logo.
Send PDF Packing Slip to dropshippers:
With this enabled, the Dropshippers will receive a .PDF packing slip attached to their Orders without the need to log in.
Footer text to appear in the Dropshipper packing slip:
Just as the title says, read previous field for more instructions.
Show product images in web-based Dropshipper packing slip:
If enabled, the web-based packing slip will show the product images next to the product names.
4) Assigning the dropshipper role to users – top
First of all, we need to assign the Dropshipper role to our selected users. To accomplish this, in the Admin dashboard go to Users → All Users.
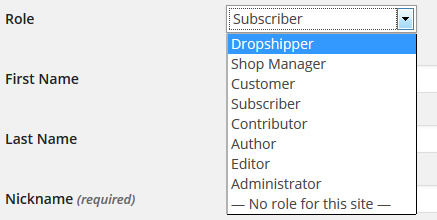
Once here, select the user that you want to turn into a dropshipper. In this example we will use the user “John” with the role Subscriber.
Hover on the name and select “Edit” to go into the user edit screen.
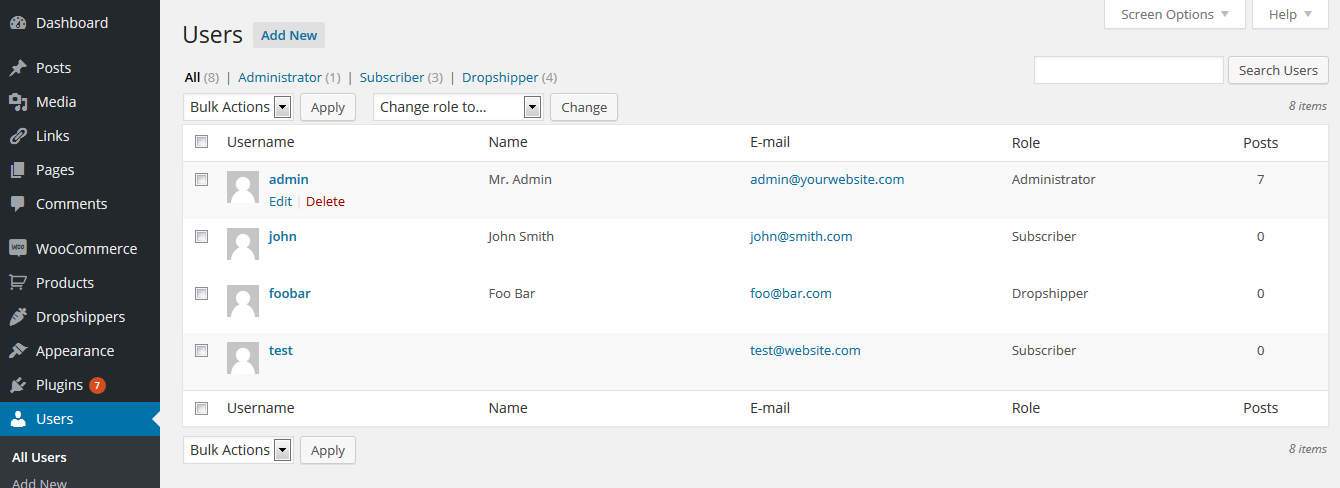
Change the role to “Dropshipper” and click the blue button “Update User” to save the new role. The user John is now officially a Dropshipper and we can assign him to various product in the market.
5) Dropshippers List – top
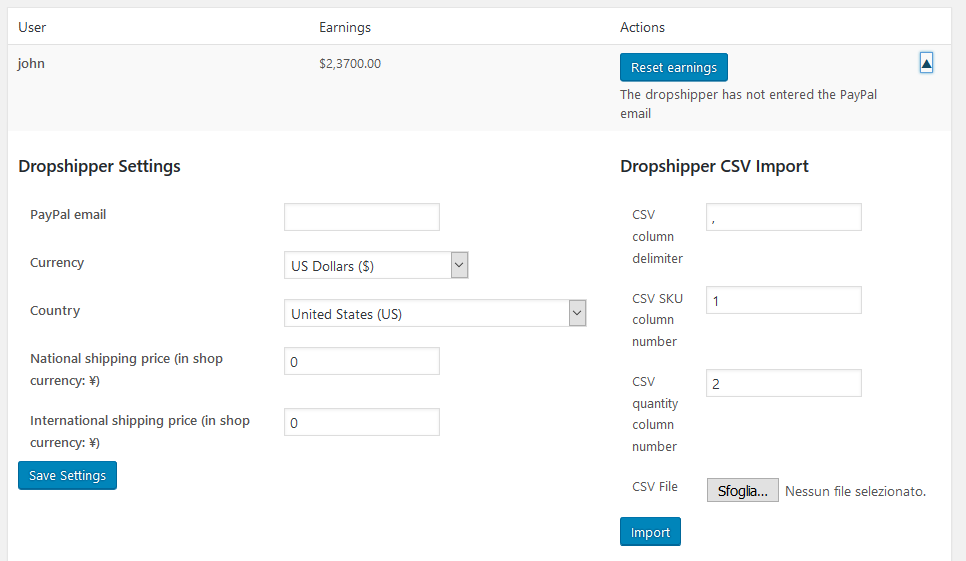
Users who have become Dropshipper, will now be displayed in a separated screen under Dropshippers → Dropshippers list. From here you can keep an eye on all dropshipper earnings.
If a dropshipper has set his PayPal email address from his profile, you will see the button and you will be able to send him/her a payment directly from this page. Otherwise you can choose to pay a dropshipper the way you prefer outside the website (bank transfer, check, etc…). The button reset earnings will allow you to reset the earnings of a dropshipper once the payment is done.

The Administrator can easily update the dropshippers information (such as the PayPal email address, etc) and save them by opening his row on the table. The Administrator can also update the quantity of products owned by a Dropshipper uploading a CSV file directly from his row. Before uploading the CSV, the Administrator have to set how the CSV will be processed changing the following fields accordingly:
- CSV column delimiter: Character to separate fields (e.g. Comma “,”)
- CSV SKU column number: Enter the column number for the SKU (e.g. if the SKU is in the third column, then insert 3)
- CSV quantity column number: Enter the column number for the quantity of the product (e.g. the Quantity of the product is in the fifth column, then insert 5)
6) Assigning products to dropshippers – top
Manual Assign
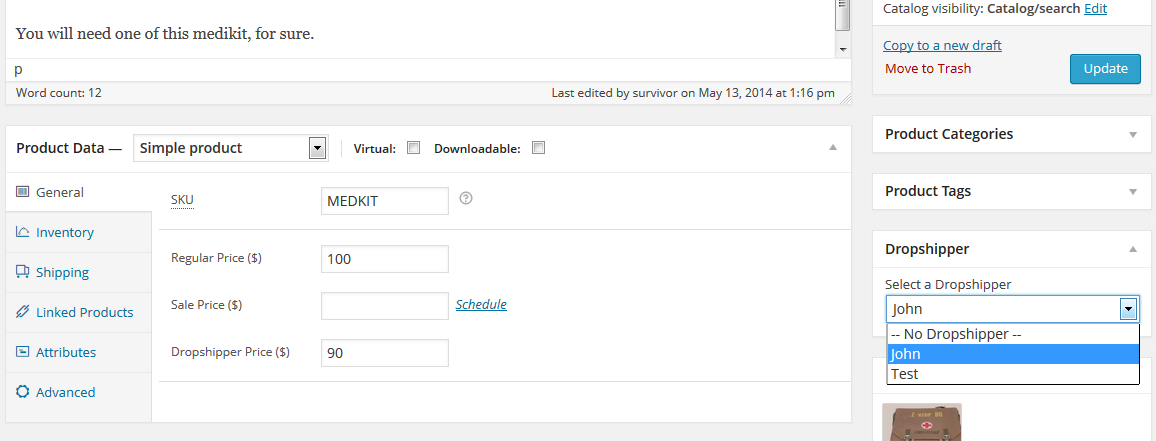
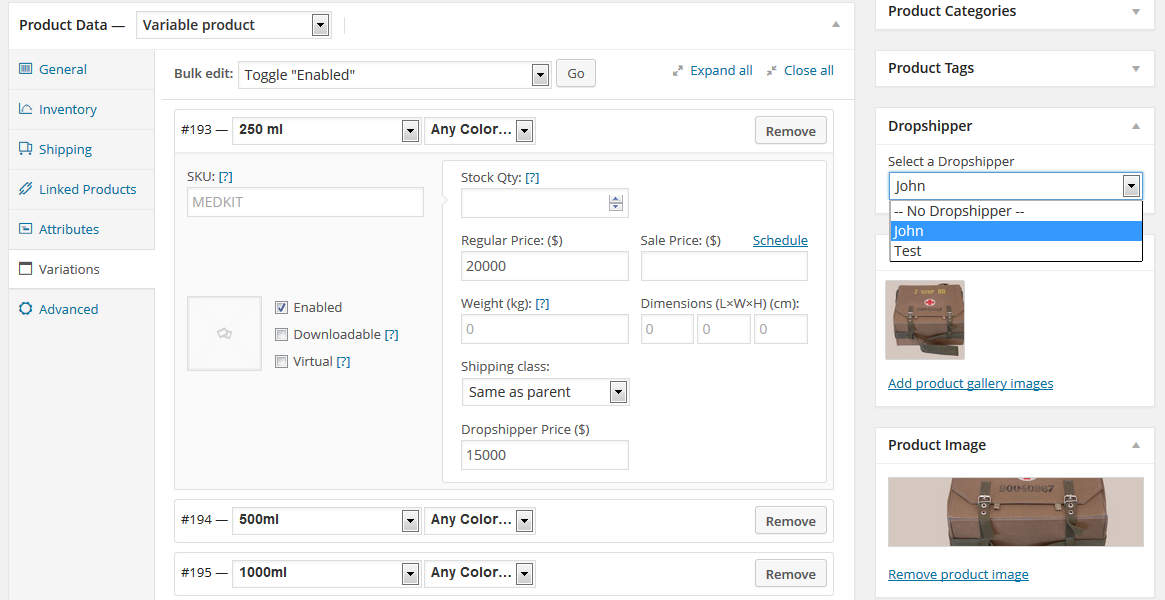
To assign a product to one dropshipper we need to go to the product edit page. There will be a new widget called “Dropshipper”(If you do not see that, go on the top right corner of the product page and under “Screen Options” put a check mark on “Dropshipper”). To assign the product to a specific dropshipper user, just select his name from the list of dropshippers. Then click “Update” to save the changes made.
You can set a Dropshipper price in both Simple products and Variable products. The price you set here will be used to calculate the amount owed to the dropshipper for each product (or product variation) sold.
Example: Simple product
Example: Variable product
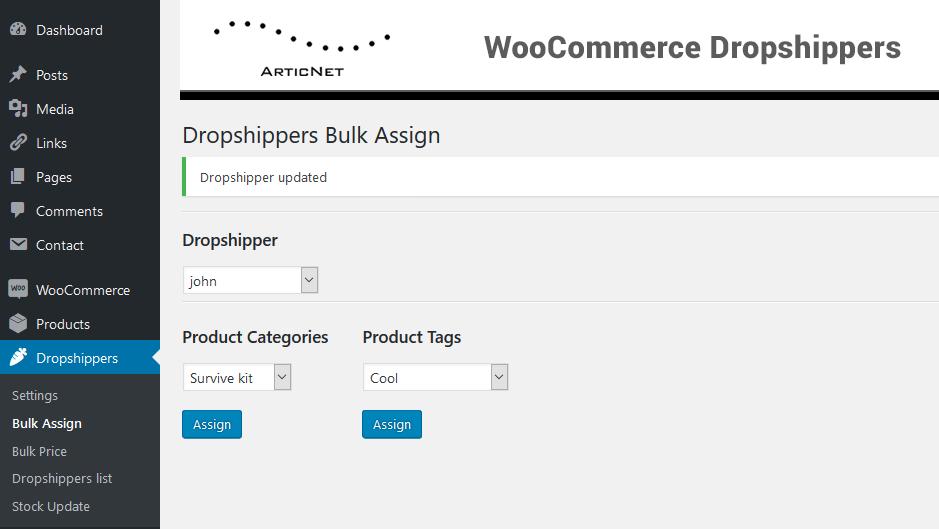
Bulk Assign
From verion 2.1 it’s possible to assign a dropshipper to all the Products in a specific taxonomy like Product Category (or Sub-Category) or Product Tag. To do so, go under Dropshippers → Bulk Assign. Select a Dropshipper, select a taxonomy, then press the Assign button for that taxonomy and wait for the result.
Bulk Price
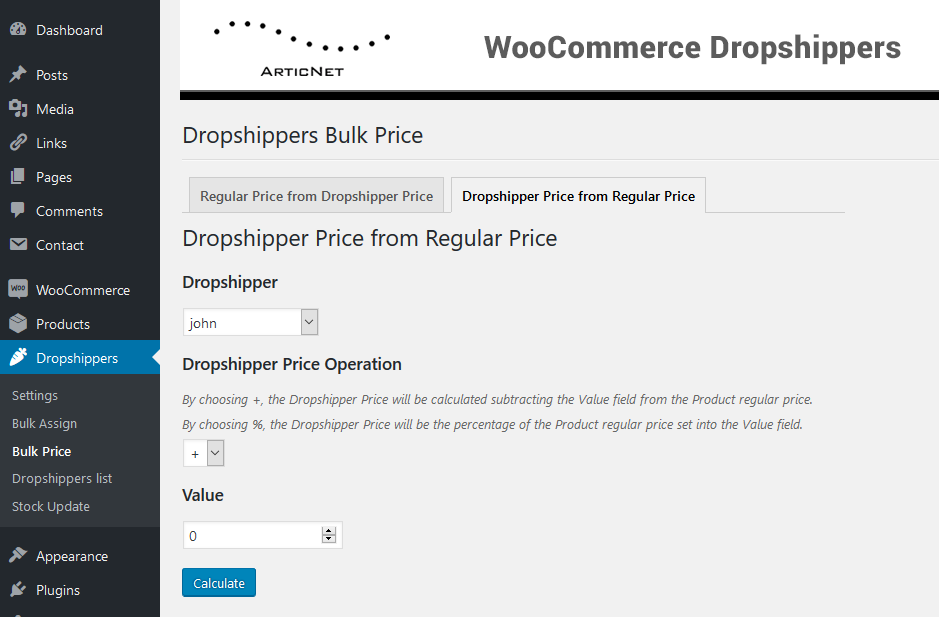
From verion 2.6 it’s possible to assign a dropshipper price to all the Products assigned to a specific Dropshipper. To do so, go under Dropshippers → Bulk Price. Select the tab Dropshipper Price from Regular Price. Select a Dropshipper, select a Price Operation, then enter the right value, press the Calculate button and wait for the result.
By choosing +, the Dropshipper Price will be calculated subtracting the Value field from the Product regular price.
By choosing %, the Dropshipper Price will be the percentage of the Product regular price set into the Value field.
From verion 3.0 it’s possible to assign a Regular Price price to all the Products assigned to a specific Dropshipper from the Product Dropshipper Price. To do so, go under Dropshippers → Bulk Price. Select the tab Regular Price from Dropshipper Price. Select a Dropshipper, select a Price Operation, then enter the right value, press the Calculate button and wait for the result.
By choosing +, the Regular Price will be calculated adding the Value field to the Product Dropshipper Price.
By choosing %, the Regular Price will be the percentage of the Product Dropshipper Price set into the Value field.

7) The dropshipper’s view – top
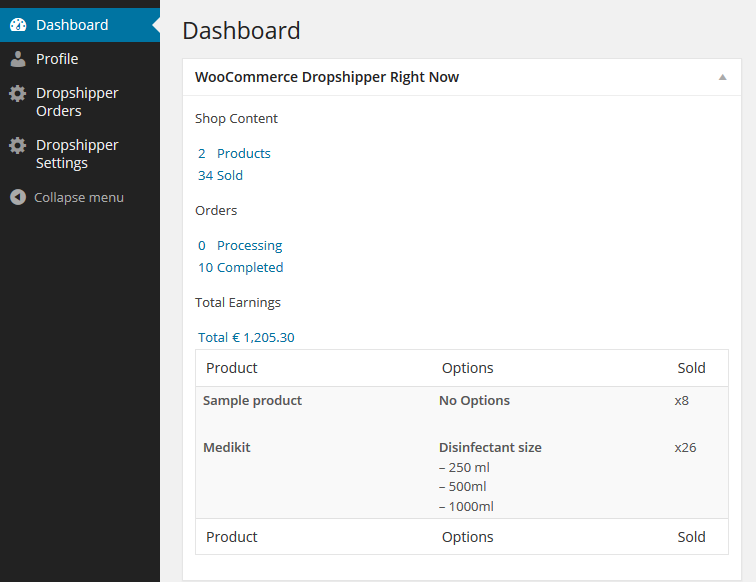
Once logged in as a dropshipper, the user will land on a regular Subscriber Dashboard but with a new widget: WooCommerce Dropshipper Right Now.
With this widget the dropshipper is able to see how many products he has sold on the market.
In addition to the widget, there will also be two new pages: Dropshipper Orders and Dropshipper Settings.
Dropshipper Orders
In the Dropshipper Orders page a dropshipper can view all orders placed on his products. New dropshippers orders will be visible when the payment is completed (order status “processing“).
Once the order is visible on the dropshipper’s page, the dropshipper can notify the admin of the shipment of the product by clicking the button Mark as Shipped. The mail sent to the admin will containt the order number, the dropshipper name and all the shipping information entered by the dropshipper.
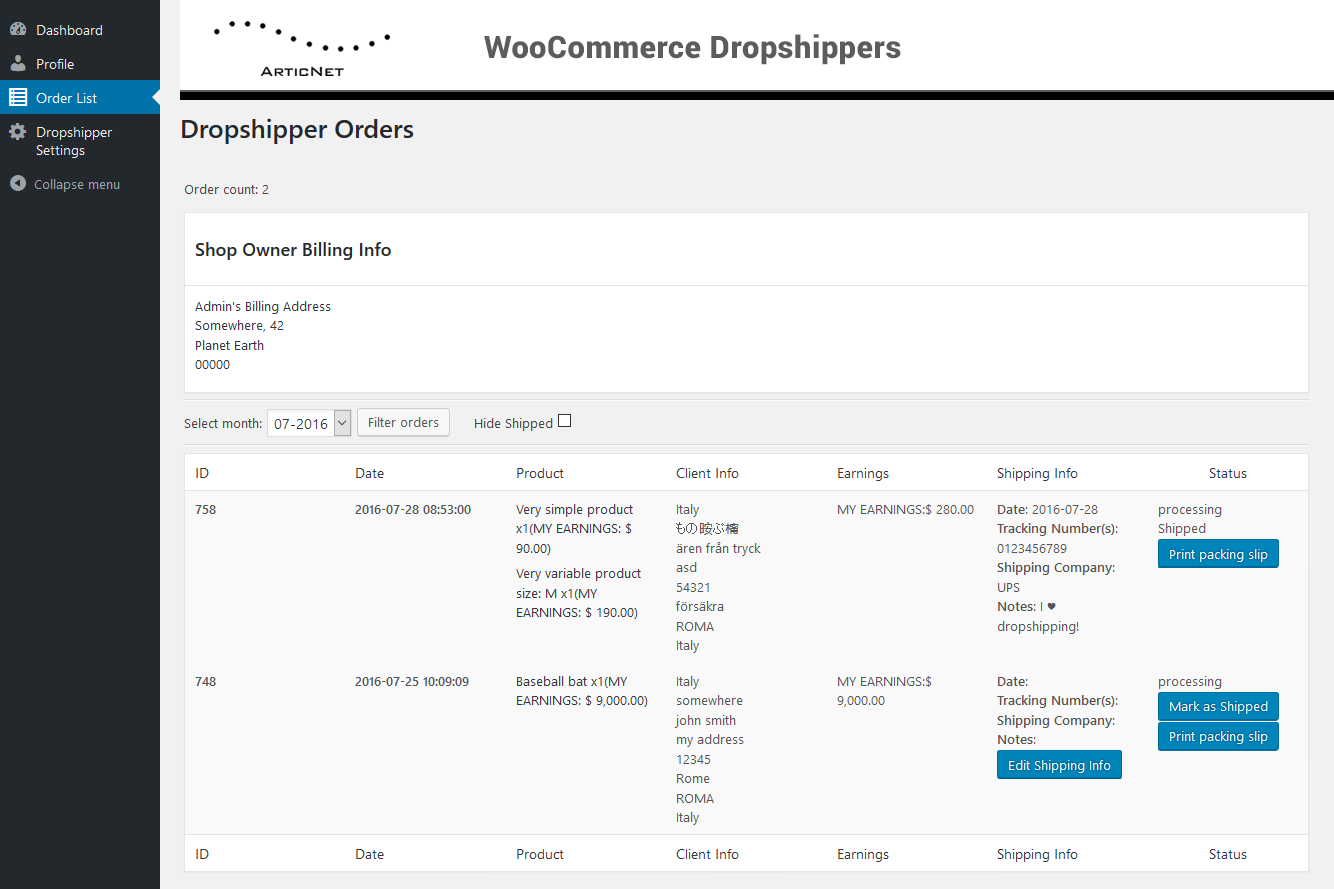
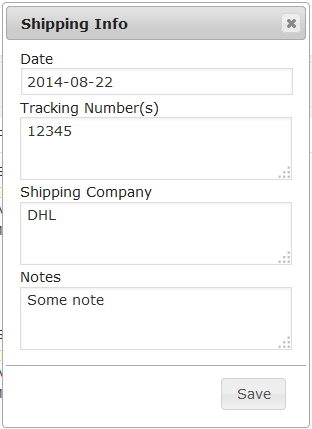
By pressing the button Edit Shipping Info you will get a popup window containing all the information that a dropshipper can report to the admin.
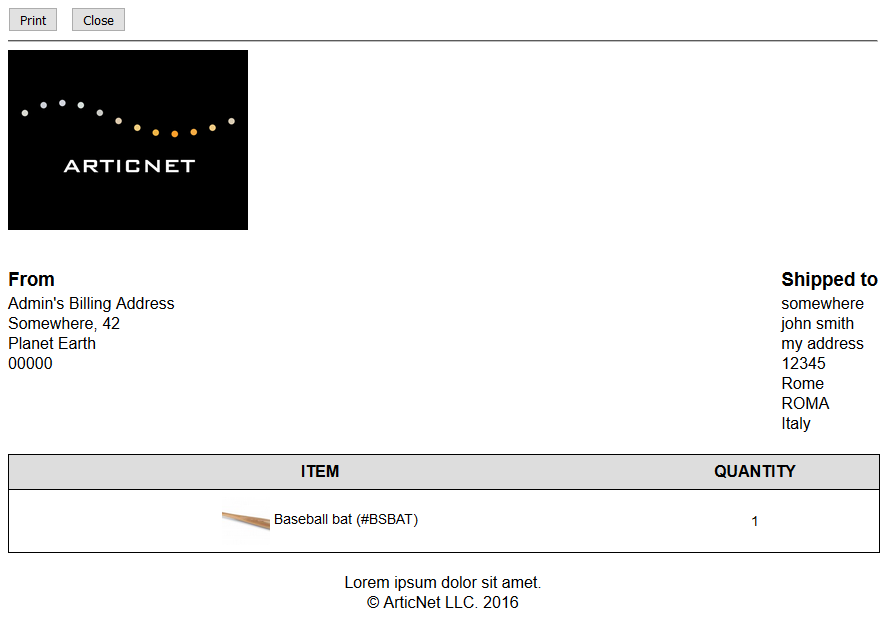
By pressing the button Print packing slip you will get the following popup window containing the packing slip ready to be printed.
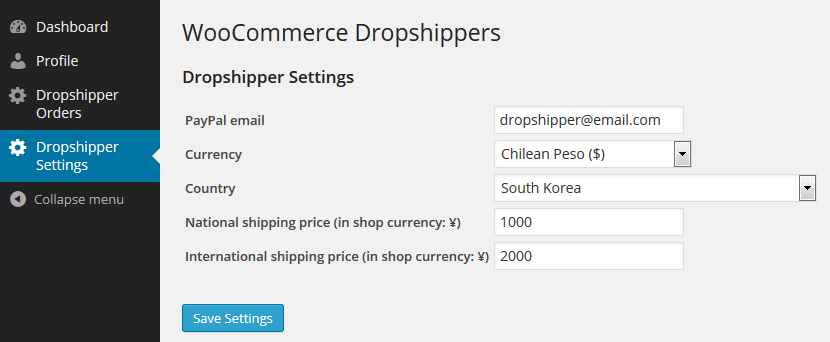
Dropshipper Settings
In the Dropshipper Settings page a dropshipper can set his PayPal email (if he has a PayPal account) and choose the currency displayed in his order page. Currencies that differs from the default currency of the shop will be automatically converted via Yahoo! Finance.
If the Administrator choose to allow dropshippers to add a shipping fee, here can also be set the country of the dropshipper, National and International shipping fee.
National and international shipping fees are considered in default shop currency, NOT the one choosen by the dropshipper.
The international and national fee will be applied based solely on the customer’s country and the country that the dropshipper will set in this panel. The country of the main shop is not considered!
8) The admin’s view – top
The regular order page now shows the column Dropshippers.
In this column an admin is able to see all the dropshippers involved in an order and who have already shipped their merchandise.
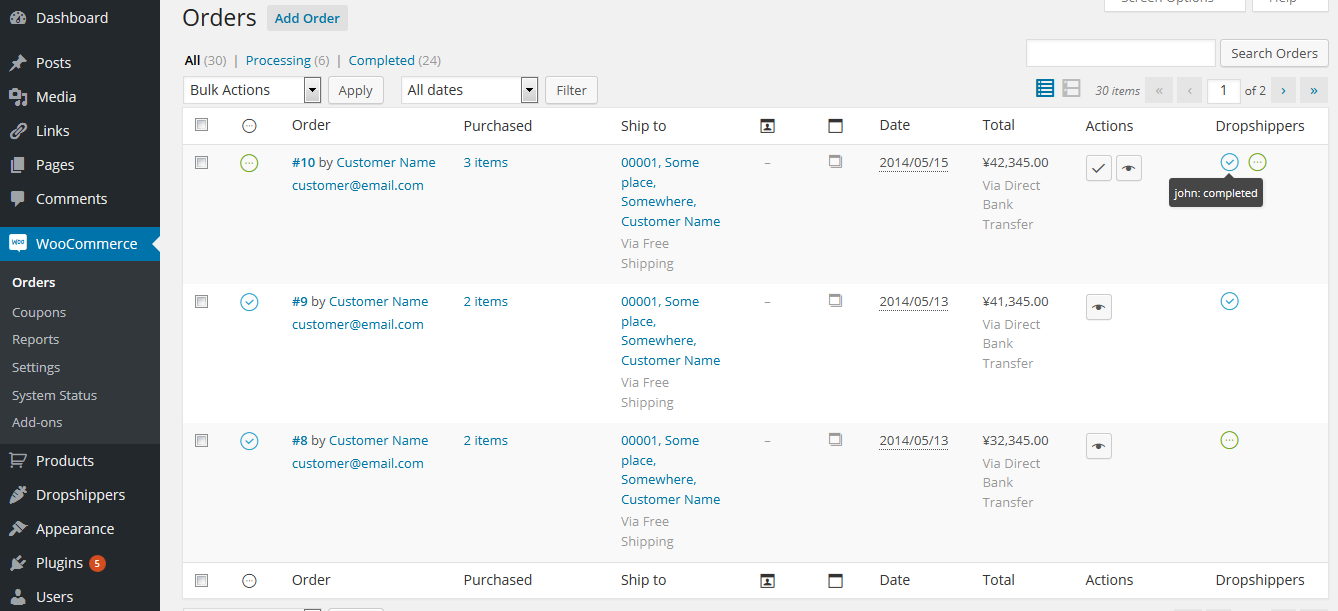
The dropshippers’ status can be Completed (blue icon) or Processing (green icon).
9) Stock Update – top
The “Stock Update” section will allow you to download and bulk update product stocks and dropshipper assignments to them via CSV.
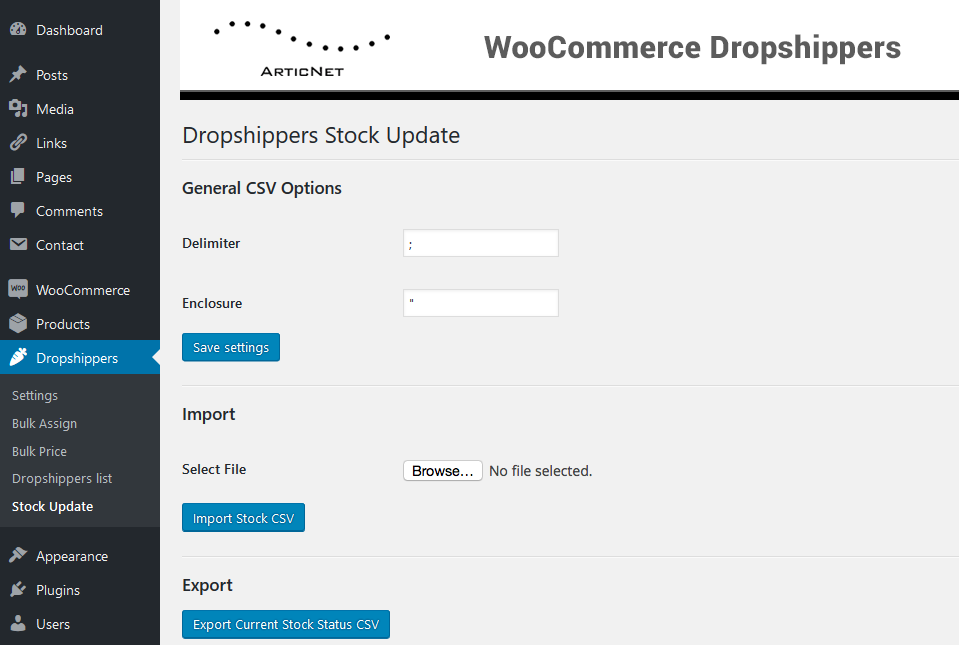
First of all, setup your general options. Fields Delimiter and Enclosure can be changed to accomodate your needs. Common values are “ , ” for Delimiter and “ " ” for Enclosure.
Now the current store product list can be exported in CSV format by pressing the Export button. The exported CSV file can be easily edited with software like Microsoft Excel or Libre Office Calc.
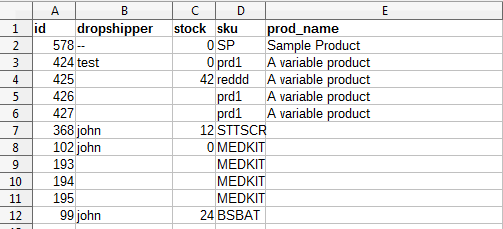
By changing the value in the column dropshipper you will assign that product to that dropshipper. To do that, you must use the dropshipper’s login name. If you don’t know the login name you can find it under Dropshippers → Dropshippers List in the main menu. Leave the field blank or write “ -- ” in it to remove the current assigned dropshipper.
By changing the column stock you can change the current stock of the product.
Once the changes are made, by pressing the Import button you can upload the modified version of the exported CSV.
NOTE: The first 3 columns are the only recognized by the system.
The column id correspond to the WooCommerce product id.
The column dropshipper correspond to the dropshipper’s login name.
The column stock correspond to the current stock of that product.
The other fields are supposed to help the administrator recognize the products while editing the CSV file but they will be completely ignored during the import.
10) Hooks – top
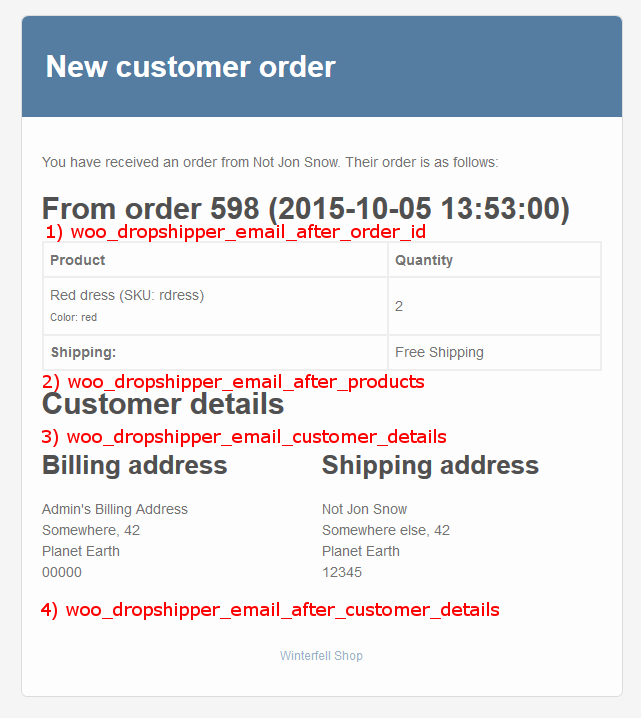
There are 4 filter hooks into the Dropshipper Email:
woo_dropshipper_email_after_order_id: right after the order id and datewoo_dropshipper_email_after_products: under the products table, before the customer detailswoo_dropshipper_email_customer_details: within the customer details before the addresseswoo_dropshipper_email_after_customer_details: after all the customer details and the addresses
Example:
	add_filter('woo_dropshipper_email_after_customer_details', 'my_function', 10, 2);

	function my_function($text, $order_id){
		return "$text\n" . 'The Order ID is ' . $order_id;
	}
You can find more information about using WordPress filters at https://codex.wordpress.org/Function_Reference/add_filter.